If you’ve ever admired the sleek, durable labels on outdoor gear, high-quality clothing, or premium bags, chances are you’re looking at a PVC rubber label. These versatile labels blend softness, durability, and customization, making them a top choice for brands wanting to elevate their products with a professional, long-lasting finish. Whether you’re a small business owner, a DIY enthusiast, or someone curious about the manufacturing process, this guide will walk you through exactly how to make PVC rubber labels—from material preparation to the final product, with pro tips to ensure flawless results.
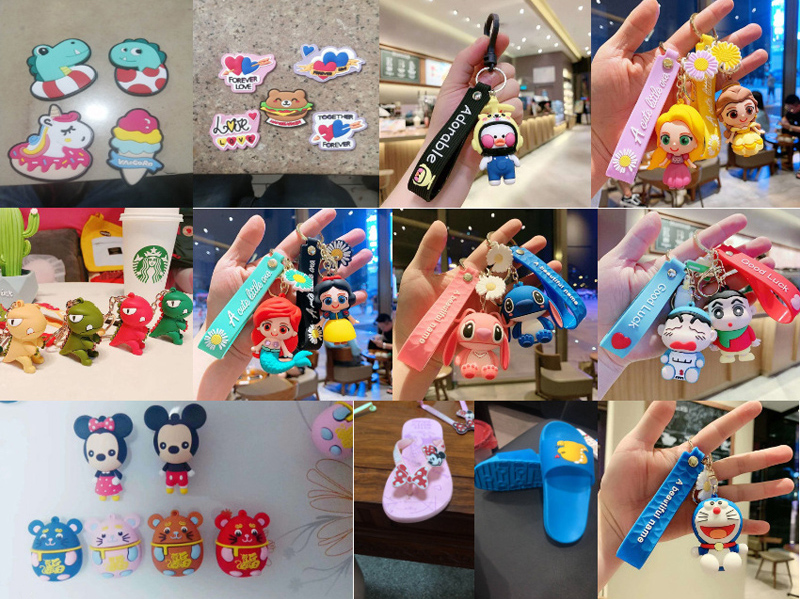
First, let’s clarify what a PVC rubber label is. Made from polyvinyl chloride (PVC) combined with plasticizers and other additives, these labels have a soft, rubber-like texture that’s flexible enough to conform to curved or uneven surfaces, yet tough enough to withstand water, UV exposure, chemicals, and daily wear and tear. Unlike woven or paper labels, PVC rubber labels offer superior durability and can be customized into 2D or 3D designs, with vibrant colors, embossed logos, or even glow-in-the-dark effects—making them ideal for everything from outdoor apparel to industrial equipment.
What You’ll Need (Materials & Tools)
Before diving into the process, gather these essential materials and tools to ensure a smooth workflow. The quality of your supplies directly impacts the final look and durability of your labels, so opt for high-quality products where possible:
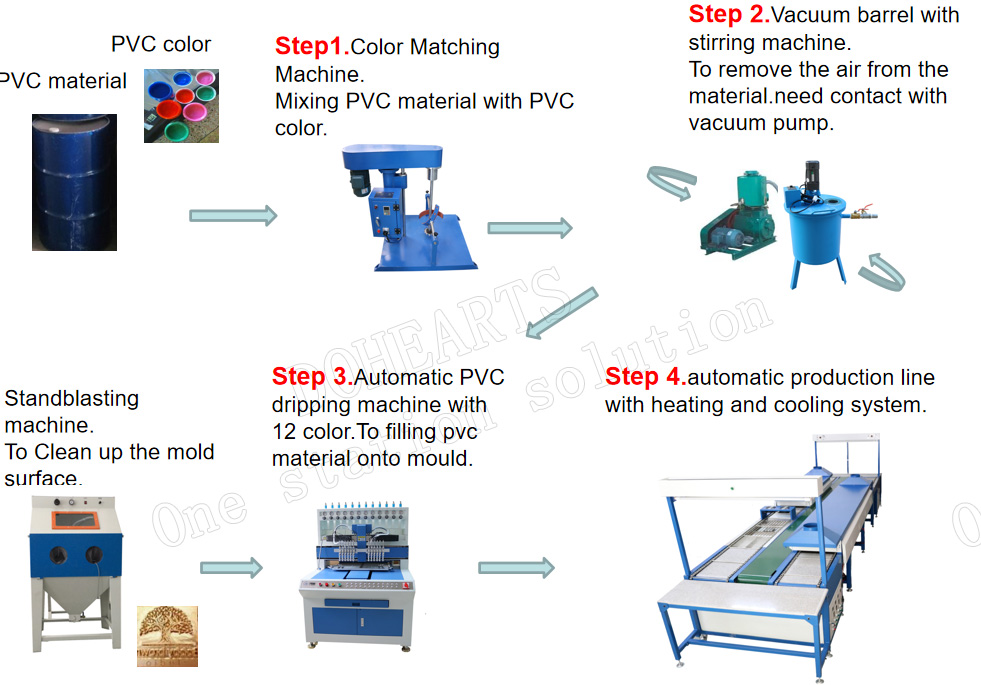
- PVC Raw Materials: PVC resin (the base material), plasticizers (to add flexibility), stabilizers (to prevent degradation from heat/UV), and pigments (for custom colors). You can also use pre-mixed PVC compounds for convenience, available in various hardness levels.
- Mold: A custom mold (usually made of steel or silicone) engraved with your desired design, logo, or text. For DIY projects, silicone molds work well; for bulk production, steel molds offer precision and durability.
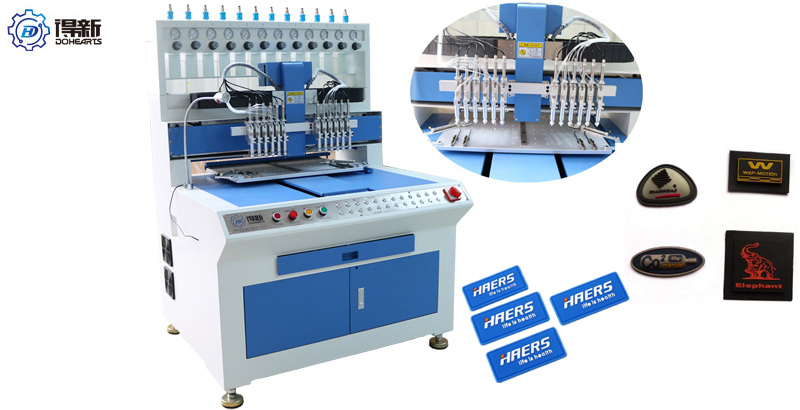
- Dispensing Machine: To accurately apply PVC material and pigments into the mold. For small-scale projects, a manual dispenser can work, but automatic machines ensure consistency for larger batches.
- Baking/Oven Equipment: An industrial oven or baking machine to cure and cool the PVC material. Temperature control is crucial here—look for equipment that can maintain consistent heat (typically 150-180°C).
- Finishing Tools: Sandblasting equipment (to create a glossy finish and help separate the label from the mold), plating solution (to prevent color bleeding and ease cleaning), and trimming tools (to refine edges).
- Adhesive/Backing (Optional): 3M adhesive, velcro, or sewing grooves if you want the label to be easily attached to products. You can also add holes or chains for keychains or accessories.
Step-by-Step Guide to Making PVC Rubber Labels
Now that you have your supplies ready, let’s break down the process into simple, easy-to-follow steps. This method works for both small-scale DIY projects and commercial production, with adjustments for scale as needed.
Step 1: Prepare the Mold
Start by preparing your mold—this is the foundation of your label’s design. If using a new mold, clean it thoroughly to remove any dust, oil, or debris that could affect the label’s surface. For better release and a smoother finish, you can apply a thin layer of mold release agent or use a silicone mold, which naturally resists adhesion. For commercial production, consider plating the mold: submerge it in a special plating solution and heat it (via boiling) to create a protective coating that prevents color sticking and simplifies cleaning.
Step 2: Mix & Prepare PVC Material
Next, prepare the PVC compound. If using raw materials, mix the PVC resin, plasticizers, stabilizers, and pigments in the correct ratio (follow the manufacturer’s instructions—typically 100 parts PVC resin to 30-50 parts plasticizer). Use a mixing machine to ensure all components are evenly distributed, creating a smooth, consistent paste. For custom colors, match the pigment to your desired Pantone color code for accuracy; you can also add effects like glow-in-the-dark or transparent tones for a unique look.
Step 3: Fill the Mold & Add Color Details
Using a dispensing machine, carefully fill the mold with the PVC compound. For labels with multiple colors or detailed designs (like logos with different shades), first fill the color details (e.g., text or small graphics) into the mold, then bake them in the oven at 150°C for 5-10 minutes to set. Once the color details are cooled, fill the rest of the mold with the base color PVC compound—this ensures the design stays sharp and doesn’t bleed into the base. For 3D labels, add extra PVC to the design area to create a raised effect, which adds tactile appeal and makes logos stand out.
Step 4: Cure & Cool the PVC
Place the filled mold into the baking machine and cure it at the recommended temperature (160-180°C) for 10-15 minutes. The curing time depends on the thickness of the label—thicker labels may need extra time to ensure the PVC is fully set. After curing, remove the mold from the oven and let it cool completely (this usually takes 15-20 minutes). Cooling is critical: if you remove the label too soon, it may warp or lose its shape. For a glossy finish, use sandblasting equipment on the label surface after cooling—this also helps separate the label from the mold more easily.
Step 5: Demold & Finish the Label
Once the mold is fully cooled, gently remove the PVC rubber label from the mold. If it’s stuck, use a soft tool to pry it loose—avoid force, as this can damage the label’s edges. Next, trim any excess PVC or uneven edges with a sharp tool to refine the shape. If you want to add a protective finish, apply a clear topcoat to enhance durability and resistance to scratches. Finally, add your chosen backing: sew-on grooves, 3M adhesive, velcro, or holes for attachment. For a professional touch, inspect each label for defects (like bubbles or color inconsistencies) and discard any that don’t meet your standards.
Pro Tips for Perfect PVC Rubber Labels
- Control Temperature & Time: Over-curing can make the label brittle, while under-curing leads to a soft, easily damaged product. Invest in a temperature-controlled oven to ensure consistency.
- Choose the Right Mold: For intricate designs, use steel molds for precision; for DIY projects, silicone molds are affordable and easy to use. Plating the mold will extend its lifespan and improve label quality.
- Test Before Bulk Production: Always make a small test batch first to check color, shape, and durability. This helps you adjust the formula or process before scaling up.
- Opt for Eco-Friendly Materials: If sustainability is a priority, use eco-friendly PVC alternatives like TPU or silicone, which offer similar durability with a lower environmental impact.
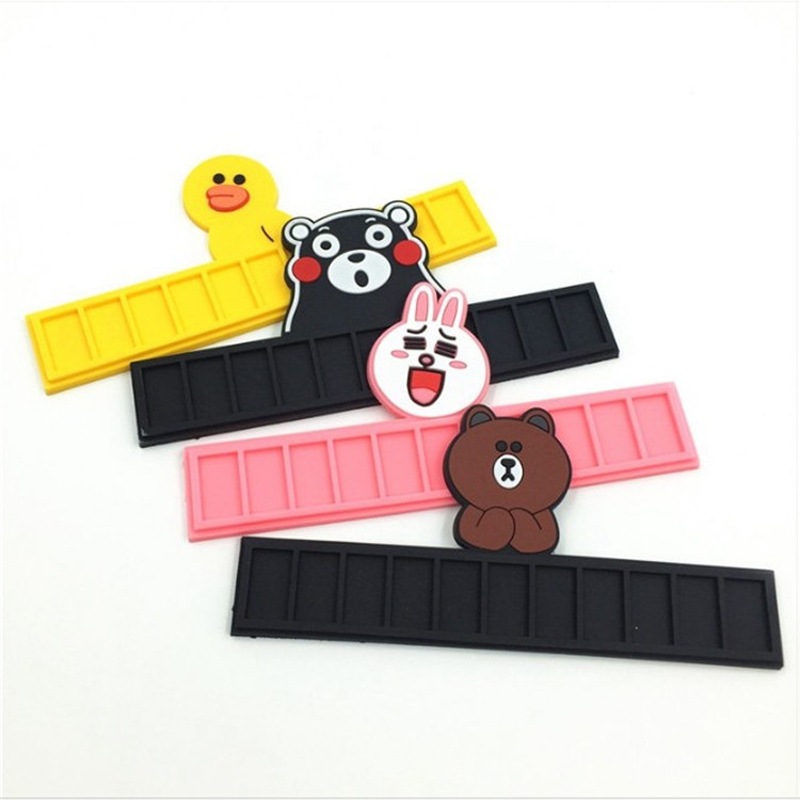
- Customize Wisely: 3D embossed logos are more eye-catching than flat designs, making them perfect for branding. For outdoor products, choose UV-resistant pigments to prevent fading.
Why Choose PVC Rubber Labels?
Beyond their easy manufacturing process, PVC rubber labels offer countless benefits that make them a favorite among brands and creators. They are waterproof, UV-resistant, and resistant to chemicals and wear, making them ideal for outdoor gear, swimwear, workwear, and industrial products. Their flexibility allows them to conform to curved surfaces (like shoes or bags) without peeling, and they can be customized into any shape, size, or color—from simple text to complex 3D logos. Unlike woven labels, PVC rubber labels don’t fray, and they maintain their shape and color even after repeated washing or exposure to harsh conditions.
Whether you’re creating labels for your brand, DIY projects, or promotional items, making PVC rubber labels is a straightforward process that yields professional, long-lasting results. With the right materials, tools, and a little patience, you can craft labels that elevate your products and leave a lasting impression on customers.
Ready to start making your own PVC rubber labels? Gather your supplies, follow these steps, and let your creativity shine—your perfect custom labels are just a few steps away!
Post time: May-08-2026